|
Many Volvo 610's only come with a single bed. This is because they are often used for regional hauling or by a single
driver, instead of being team driven. Most Volvo's that are team driven are 770's, because they have additional space
in them with the larger condo.
All Volvo's have the connection points for the upper bunk, and you can order that bunk from the dealer, if you can not
find a surplus bunk. But they cost in excess of $800 by the time you buy the complete setup. The upper bunk in the Volvo
610, 660 and 770 are the same, and the mounting hardware is the same. (The 770 cab is wider, but the bunk is the same.)
Because we overnight in our truck from time to time we wanted the extra sleeping space, but did not want to pay for an
OEM bunk. We also wanted to configure the bunk so that it could be used for a backrest when in the down position. The normal
bunk folds up - we wanted our bunk to fold down to the backrest position. So we decided to build our own.
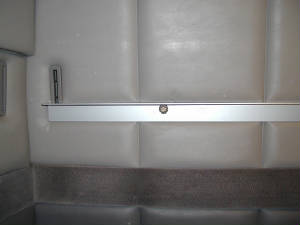
| Back edge of bunk rests on aluminum angle. |
|
| This is 2x2" x 1/8" aluminum |
On the back wall there are two connection points for attachment of the safety net for the bed. If you pull back the wall
padding you discover that these connection points are very substantial. I decided to use them for connection of the rear support
for the upper bunk. I used 2" aluminum angle to span the rear of the cab. The bunk platform rests on this when it is in the
raised position. I used the original bolts (from the safety net straps) to secure the aluminum to the back wall of the cab.
It is a very solid connection - I'm not worried about it collapsing at all.
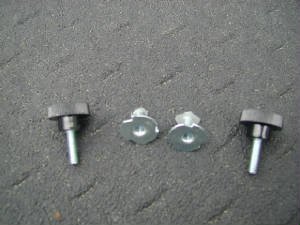
You have to secure the base of the bunk to the ledge that supports it somehow. I decided to use two treaded inserts and
screw knobs in from the bottom to secure the back of the bunk from shifting in any direction. This worked out well. It is
easy to screw them in and they hold things securely. They are not required to be real strong - they just keep things
from shifting around. I did find that I had to use a little epoxy on the inserts to keep them in place when inserted in the
wood frame. If you look at the picture carefully, you will see some tape on the back of the inserts to keep the epoxy out
of the threads when I insert them.
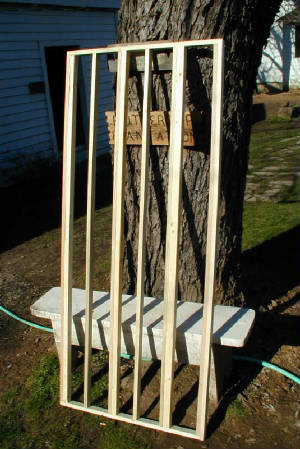
The platform is made out of wood. I originally wanted to weld it up out of 1" aluminum tubing. But I changed my mind
based on the expense and trouble. Instead, I ripped 2x2" stock out of 2x4's. I built a "ladder" framework from the 2x2's -
everything is air nailed and glued together. I doubled the 2x2's at the front and the back for extra rigidity.
This turned out not to be necessary, but without them I thought the ladder framework was a little "floppy" before being sandwiched. I
then sandwiched the ladder between two sheets of 1/4" floor underlayment - again, glued and shot with trim nails. I trimmed
the front and sides in scrap 1x3" oak and painted the entire thing "Volvo gray". Total cost was under $20 - the only thing
I had to buy was two sheets of underlayment. The rest was scrap material. The outside dimensions of the platform are
72 1/2" x 32 1/2". This leaves about an inch clearance to the walls on the sides, which makes it easier to raise and lower
the bunk into the backrest position.
Supporting the front of the bunk is a little tricky, since I wanted something that stores out of site, is strong,
and is easy to put into position by one person. I used 1/2" galvanized plumbing pipe for my supports. The tops of the pipes insert
into 3/4" galvanized pipe flanges secured underneath the platform at the corners. The tricky part is how to secure the
pipes at the base in such a manner as to allow them to swivel for both easy placement into the flanges, and to fold down alongside
the lower matress. I used swivel casters (100 lb rating) with the wheels removed and the pipes inserted in them. This works
well - it allows you to get the angle you need to orient the pipe properly when the bunk is erected, and allows you to easily
swivel the pipes out of the way for storage. The casters are screwed to the plywood lift-deck that supports the bottom mattress.
Depending on your bunk setup you may have to extend one side an inch to properly support the caster. Because the top
platform is not as wide as the bottom mattress the pipe supports will angle in some when in the raised position. This is easily
accomplished with the swivel casters.
| Left bunk support from below/behind. |
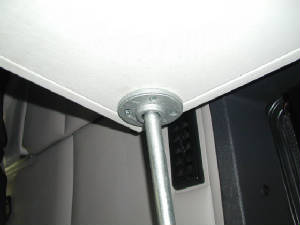
|
| Flange holds support in position. It does not shift at all. |
| Swivel caster secures bottom of support. |
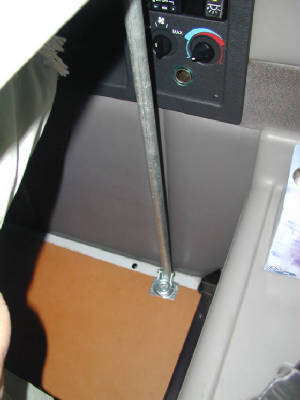
|
| Caster allows easy positioning at required angle. |
When the platform is in the backrest position there was nothing securing the top of it - the entire thing just rested
on the lower mattress. Because it was almost vertical (at about 15 degrees) it could flip forward pretty easy, as my dog discovered
on our first ride. I don't think she liked a 25-30 pound platform falling forward on her!
To secure it I used a 6" ball bungee. I connected the aluminum back support and the platform through an eye. This
works great. It keeps the platform from flipping forward, yet stretches enough that I don't have to mess with it during the
setup of the bunk. My dog is much happier, thus Danielle is happier, which means I am happier!
| Bungee secures bunk when in down position. |
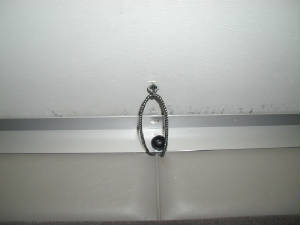
|
| Keeps the platform from flipping forward . |
| There is 22" of space between upper and lower. |
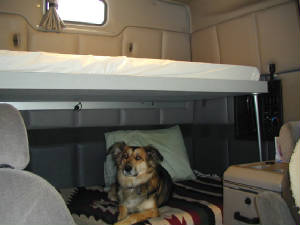
|
| Top mattress is 4" foam, currently covered with a mattress pad. |
The mattress is 4" foam. I wanted high density foam, but couldn't find it so we used regular foam. Four inches is thick
enough - 6" would be too thick and would interfere with seating when the bunk is in the down position. The foam is comfortable,
but high density would be an improvement if you can get it. Our foam is 71" x 30". We currently have it covered with a mattress
cover until we can make a nicer cover from material of some sort.
The bunk worked out well. If I was to do it over again I'm not sure I would change much. The platform is way
overbuilt and as a consequence is heavier than I would like it. You could cut the framing by half and still
have a very strong platform. I'd like to use high density foam, but if it proves to be a problem I can always add some
memory foam, or switch it out.
Overall cost was:
- Platform - $16 for 2 sheets underlayment, $4 for paint
- Hardware - casters $5, pipe $5, flanges $4, aluminum $15, inserts and knobs $5
- Mattress $42, cover $3
Total cost was around $99.
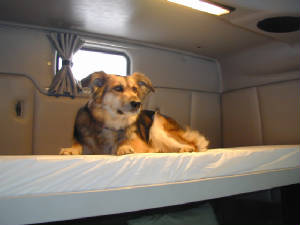
| She likes the new bunk! |
|
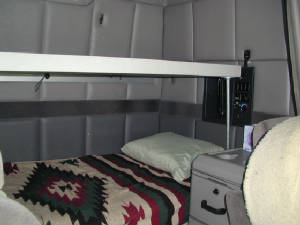
| Bunk with out the mattress. |
|
|
