|
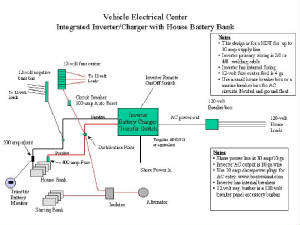
| Truck electric center with house bank |
|
Adding a separate battery bank for your
"house" loads means you have to:
1.) Provide
for a primary charge method – this is your inverter/charger.
2.) Provide
for a means of charging while not connected to shore power – via your alternator.
3.) Isolate
the starting and house banks electrically, while still allowing a charge from the alternator. You have a choice here –
a solenoid, a simple battery isolator, a “smart” isolator, or a multi-output regulator that has a separate charging
algorithm for the house bank. There are variations of each category, but these cover the major groups.
4.) Provide
instrumentation, so you know what your house bank is doing; when to stop drawing it down, when to charge it, when it is in
trouble. Without instrumentation you will eventually kill your bank, since you will never know its charge state.
5.) Determine
the type of battery to use; flooded cell, gell, etc. I highly recommend a simple 6-volt lead acid golf cart battery, available
at Sam’s Club for under $50 each. If you can convincingly argue that a gell or other type is better, or that 12-volt
batteries are better, then you don’t need to be reading this. I recommend the lead acid because if you screw up your
bank they are cheaper to replace. Consider them as your training wheels. If you have the need, and get to the point where
you can manage your batteries well, then you might switch to a more sophisticated battery technology. Bring money, though.
You need to use 6-volt batteries hooked in series-parallel. There are many discussions on the net about using banks of 12-volt
batteries instead of 6-volt. Don’t do it. There are many reasons why – do your own research if you want. Or just
take my advice and buy 6-volt golf cart batteries and be happy with your system.
6.) Determine the size (in
amp-hours) of the house bank. To do this you need to know your electrical requirements while without a charging source (boondocking)
– how long will you watch TV, how much will you use the coffee maker, the microwave, etc. You can calculate the requirements
of each appliance from the electrical plate on them. Add in any 12-volt lighting that is tied to the house bank. Then add
around 15-25% to that.
Here is the rule of thumb for battery use: never use more than 50% of the
amp-hours in the bank. Figure normal electric usage as 25% of the bank, that way you can go several days without negatively
affecting your battery bank. This applies to deep cycle batteries only – NOT to starting batteries.
A standard
6-volt battery pair, hooked in series for 12-volt will have an amp-hour rating of 200-220, depending on the battery (we will
use 200 for figurin’). So if you have a bank of 4-6 volt golf cart batteries you have 400 amp hours total, of which
200 is available for use. This is going to be more than enough for almost all peoples needs, assuming you are just supplying
the truck, and not an RV as well. We boondock for months at a time in our 5er with a bank that size, and use our sat TV, microwave,
coffee maker, etc. Of course, we fully recharge with solar each day. We rarely see more than 100 amp-hours of deficit –
but you can now see the importance of instrumentation. Otherwise, how do you know what you used? So, I recommend a 4-battery
bank. A 2-battery bank would suffice for most people, but 4 will cover any extra requirements in the future.
7.) You need to decide where
to put the batteries. Use your imagination, but remember, it is best to keep the wire run to the inverter as short as possible.
Definitely not farther than 10’, max, which includes twists and turns to get there. If you have more than 5’ of
run, use 4/0 cable, despite what you might read in your inverter manual. Actually, I always use 4/0 for any inverter over
1200 watts. You also need to make sure the inverter is not in the same enclosure as the battery bank. Batteries are explosive
devices – inverters have relays and other electrical components in them. Batteries also outgas while charging. You don’t
want your inverter in the hostile environment of a battery. Also, when locating the battery box, make sure it is easy to service
the battery bank. You will need to check fluid level at least once a month, especially if the house bank is heavily used.
Charging the House Bank
We already know that we need a 3-stage
charger to properly maintain the house bank. Fortunately the inverter has such a beast, so you have a good charge source when
plugged in. What about while driving?
An automotive alternator, along
with its regulator, is designed to charge a starting battery bank. When you add the house bank there is no method to add a
separate charging circuit to the existing regulator to independently charge the house bank. It is simply not designed for
that. In addition, you don’t want your house loads to draw down your starting battery. That requires that the house
and starting bank be isolated from one another when you are using power, but that they be combined when the alternator is
supplying power for recharging.
The one thing you never want to
use to combine banks is an A/B/ALL battery switch. You WILL forget to properly switch it, and if done improperly it will destroy
your alternator, and probably much of the computer electronics in your vehicle. Don’t
use it.
The simplest way to combine (and
by combine, we are talking for charging purposes, not for starting) the banks for charging is with a simple high-power relay
(150 amp normally open). When the engine is running the relay is closed and charge output from the alternator goes to both
banks. When the engine is off, the relay opening isolates the banks. Under $40, but you will never get a good charge on the
house bank. That is because the starting bank will probably come up to full charge
first, and the regulator will shut the charge down to both banks. Remember, the regulator knows nothing about two banks. This
might be OK if you intend to plug into shore power often and use the high-power charger in the inverter to maintain the house
bank.
An alternative, and a better solution,
is to use a solenoid with a charging controller integrated with it. There are various models on the market. The logic in the
controller maintains and manages the charge to both banks, based on various settable conditions. It is acting as a smart charge
regulator. Some of these even have temperature compensation. They are not cheap
however. Expect in the $150+ range, depending on features. Take a look at the
Ample Power Autoswitch. A disadvantage to all types of relays/solenoids is that they can fail. In some cases they can also
push a high voltage surge through the system, although this is rare.
You could also use an isolator with
a diode built into it. The typical reason not to use a diode-based isolator is
that they consume about .5 to 1.5 volts while active. This lowers the voltage
to the banks and results in never obtaining a full charge. If you use an isolator with a Schottky diode instead of a silicone
diode you will eliminate most of this loss. At 100 amps, expect to loose around .45 volts with a schottky-based isolator,
and around .8 volts with a silicone-based isolator. The isolator is a much better, but a relatively expensive, solution
at around $140+ depending on features (they go up fast). Hellroaring makes an advanced isolator with minimal voltage drop.
Check out the BIC-85150A for around $150. Again, if you know you are going to correct this charge deficit with shore power,
a low cost isolator can be an adequate solution. A regular old cheap isolator rated at 150 amps should be around $70 or less.
Another alternative, although I
doubt most of us need it, is to replace or augment the existing regulator with a dual output regulator with inbuilt 3 stage
charging. There are various capabilities and alternatives here. You will get
a great charge, but expect to pay $400+ by the time you set up your system properly.
I recommend something
like the Ample Power autoswitch, or the Hellroaring isolator. It is a good compromise between cost and functionality. It will
give you a good charge, protect your batteries, and is relatively simple to install.
Instrumentation
Without a way to determine battery
state-of-charge you are risking killing your batteries. You also don’t know how much energy is available for your use.
Any system using a separate house bank without a battery monitor is an incomplete system, and typically is not going to be
satisfactory in anything but trivial use – in which case, you should question why you have a separate house bank.
There is only one critical measure,
and that is ampere hours. An amp-hour meter measures amps consumed and amps restored. It is like a fuel gauge on your vehicle.
All quality battery monitors have an amp-hour function. They also measure voltage, and some have a simplified “fuel
gauge”-like display that gives a quick reading of battery charge state (half full, ¾ etc.). You use the meter for various
things – finding the ampere consumption of an appliance while in use, determining the amount of charge going back into
the battery via the charger or alternator, condition of the batteries (by how much charge they will accept), and most importantly,
how “full” your battery is. If you have 200 amps max to use, and
you microwave something (say 4 amp hours) and brew a pot of coffee (12 cups, say 33 amp hours), and watch an LCD TV for an
hour (about 8 amp hours), plus you have a phantom draw (more on that later) of 8 amp hours (per day) you now know, through
the meter, that you have a deficit of 53 amp-hours. This is well within the 25% rule (which would be 100 amp hours on a 400
amp hour battery bank). If you did not have the battery monitor, you would never know.
A note about phantom loads. Every system has consumption even if nothing is “on”. This is called the
phantom load. It comes from various things like “instant on” TV’s,
charging bricks, inverters left in standby, microwave displays, and just electrical “leakage”. You need to determine
the phantom load on your system using the amp hour meter – the phantom load adds up fast over a one or two day period.
To measure amp hours, the battery
monitor uses a shunt installed in the negative line, and a remote display attached via a telephone cable, or Ethernet cable
(typically). All loads have to be attached upstream of the shunt (e.g. don’t terminate your negative busbar or distribution
hub on the battery side of the shunt). Use a 500 amp shunt to get measures of hundredths of an amp. Most monitors come with
an appropriate shunt, but be sure to include that in your pricing if they are extra.
Battery monitors also provide you
with battery voltage, which is really only useful to observe charge stage, or to determine if the battery is really totally
full or discharged. Voltage is not an accurate measure of battery state of charge in between full and empty. The reason is that voltage is only useful if the battery is at rest for 24 hrs (i.e. no load for 24 hrs.) - not a practical option in a system being used.
There is a lot more to battery monitoring
than I have described here. Over time you will come to “know” your batteries, and how your system operates normally.
This will allow you to quickly pick up anomalies, like marginal battery cells, before things become critical. Most of the
battery monitors come with pretty good tutorials. It can be pretty overwhelming to try to learn everything at once. I would learn a little at a time, watch your batteries, and you will be surprised how soon you will understand
them.
There are various monitors
on the market. Some of the more advanced inverter/chargers have integrated monitors that are well worth the money. The Link
1000 monitor (in combination with the Heart inverters) is one example. These contain the remote switches for battery charging,
and for turning the inverter on. For the inverters we have discussed here, you will have to get a separate monitor and remote
panel. You can look at the monitors available, and do your own research, but I highly recommend the TriMetric TM-2020 by Bogart
Engineering if you need a separate monitor (separate from the inverter control functions). You should be able to get the monitor
with shunt for under $200.
You can see that adding the separate
house bank adds complexity and cost. Be sure you need it. Remember, you can always
add it later. Expect to spend at least $600 over a system without a separate house bank. Plus whatever it costs you to build
or buy the battery box.
|