After much research we decided to switch the commercial Holland hitch to a
TrailerSaver air suspension hitch. The Holland hitch can be used with 5th wheel RVs if you weld a plate onto the
dip in the hitch plate that is intended to hold grease (Fontain hitches should not need this modification). We had this done
on our hitch just in case we needed to tow before upgrading to the air suspension hitch. We never used it, though. Wiring
for the brake controller is described in The Truck Electrical Center section. This page concentrates on hitch selection and issues.
There are a number of people that tow with the commercial hitch, with no reported
problems due to impact. Others who have towed with the commercial hitch have had fractured hitch heads and welds fractured
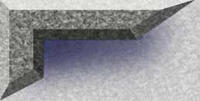
on the trailer. If you do tow with the commercial hitch, you would want to be sure that you convert the tandem axles to single
(lighter suspension). In the picture below you can see the result of towing with a HDT and the commercial hitch. Could it
happen to you? Maybe not, but why take the chance? The hitch is not the place to save money, in our opinion.
We decided to convert to an air suspension hitch based on our observations
of our Reese hitch on our F550. We are glad that we did it; watching the trailer float through rough roads confirms to us
that there is an advantage to having the air hitch in addition to the existing air suspension on the tractor. Whether it is
worth the expense is your own judgment. Since we intended to have a hauler bed built, leaving the commercial hitch on was
not a viable alternative for us.
There are a number of choices when selecting an air suspension hitch. You can
go with a truck-mounted hitch, or use a hitch like the TrailAir that mounts to the hitch head of the trailer itself. We looked
at the TrailAir carefully, both before and after aquiring the tractor. Our original intent was to use the TrailAir on
our F550 and Reese hitch. This would have worked well with the fully articulating Reese hitch. However, use of the TrailAir
with the tractor and the commercial Holland hitch is not the best solution, in our opinion, because the TrailAir does not
provide full articulation - it is designed to be used in conjunction with a side-articulating conventional hitch like the
Reese. While the TrailAir provides adequate vertical cushioning, the Holland hitch (and other commercial hitches) does not
provide sideways movement - only fore and aft. I would be concerned with the lateral forces applied by the mass of the tractor,
through the commercial hitch, to the TrailAir hitch head. You could avoid this issue by putting a conventional fully
articulating hitch on the tractor, but you are probably going to run into hitch height problems unless you recess the hitch
into the tractor frame rails. All this adds expense and aggravation - we found it easier to skip right to the air hitch. An
additional issue with the TrailAir comes with its use on a truck with a hauler body on it. The TrailAir has a long and low
plate to support its components. This plate extends rearward quite a bit, depending on the TrailAir model. It can interfere
with a hauler body where the hitch is contained in a trough. If you are building a flatbed, this would not be an issue. You
can see this in the picture below.
Within the class of truck mounted hitches there are many to choose from. The
primary selection criterion for us was the hitch plate height. Many of the available hitches were too high for our trailer
to ride level. These hitches are primarily designed for use with MDTs, which have a lower frame height, and thus a lower mounting
height for the hitch. When applied to a class 8 tractor many of them end up being too high for the trailer to ride level.
TrailerSaver has the lowest riding hitch we could find, thus our choice of TrailerSaver. Since we installed the Trailersaver
hitch we have discovered the Advanced Air Hitch http://www.advancedairhitch.com/. It is also 10" high, and has a Binkley head, with air bag side cushioning, as well as fore-aft air bag cushioning. It also
has a higher pin weight rating than the standard TrailerSaver. It is an interesting hitch and is worth a look if you are in
the hitch market. It costs considerably more than a TrailerSaver, so we would not have used it, even if it was available at
the time we chose our hitch.
Our truck has the frame cut 39" from the rear of the back tire. This allows
for good-sized boxes behind the axle, and for enough deck space to carry toys. We removed the Holland hitch and the sliding
mechanism. We bolted a 70" x 42" x ½" steel plate to the steel angle that originally supported the air-slide Holland hitch.
This plate has three mounting locations for the hitch. The rearmost location places the kingpin 14" from the rear of the truck
(39" behind the axle). The center location is 32" from the rear (23" behind the axle), and the most forward location is 44"
from the rear (8" behind the center of the axle). Unlike pickup trucks, class 8 tractors can have the hitch mounted anywhere
and perform properly. All the hitch manufacturers I discussed this with said we could mount it anywhere we wanted without
problems. We have been running with it in the middle position without any issues. Remember, the further back the hitch is, the better the trailer tracks to the tractor,
and the more deck space you have available for other uses. In our case, with
our short 182" wheelbase, in order to fit an ATV or motorcycle on the deck we will have to position the trailer in the middle
or rear-most location. Your choice of hitch location is dictated primarily by your carrying requirements. If you don't want
to carry anything on the deck, then you would probably close the gap between the tractor and trailer as much as possible.
Many people add extra weight in the form of a 1 inch steel deck that they
mount the hitch on. This is a good idea if you can afford the sacrifice in final hitch head height. In our case, we decided
that we could not afford the height increase. Adding the extra weight would result
in a better ride when bobtail, and slightly better braking performance. However, we found the ride fine with the 600
lbs added by the steel plate and the TrailerSaver hitch, even with our short wheelbase.
While having the bed built we temporarily removed the steel plate and hitch.
I did not think this would make much difference in the ride quality - boy was I wrong! It was like night and day - removing
the 600 lbs RADICALLY changed the ride quality. You really do need that weight. Now that the body is on (to the tune of about
2000 lbs - with the hitch) the ride has improved even further.
Our final ride height on our first trailer (the Kountry Star), when hooked
up with 75lbs. of air in the hitch, and with 3640lbs on the pin, was 20.5" from the tractors steel deck plate. The deck plate
itself is 39 1/4" from the ground and it is 11" from the trailer hitch plate down to the tractor deck plate (this makes
the hitch head about 50 1/4" from the ground). On that trailer, the trailer hitch
head was fully retracted. Measuring the beltline of the trailer indicated a 1.5"
drop from the front to the rear of the 36 foot trailer. This was not noticeable visually, and the trailer level indicated
that the trailer was actually level so it was hard to tell if it was off any. Note
that TrailerSaver says that the hitch plate in its lowest location is 10" (from the mounting deck) but this is without the
required air in the hitch, which added the extra inch. We were probably running a little more air than we need in the hitch
- we could have gone down to 65 lbs or so and stayed within the guidelines of the hitch, but this does not lower the final
height significantly.
Our new trailer (the Royals International) was lifted 3" by the previous owner,
so there are no level issues. We did have to recess the trailer hitch head to it's next-to-last position in order
to get level. With the trailer pin weight slightly over 5,000 pounds we had to run about 95 psi in the hitch. You
can add a third air bag to the hitch, which results in the ability to run reduced pressures - resulting in a softer ride for
the trailer. After about a year, we added this third air bag - mainly to increase the current 5000lb. pin
weight rating (which we are at) to 7500 lbs.
When looking at hitches, measure carefully. Ride height is the single most
critical measurement. You do have the option of dropping the hitch into the frame rails, but this will add cost. Also, be
aware that if you do this, your rear air suspension dump may be limited by the amount you recess the hitch unless you relocate
some of the air system components. You might also have to remove, or modify the cross-frame brace on a Volvo 610 - depending
on where you locate the hitch. Assuming you bolt in a flat plate for the hitch, it probably would not matter if you remove
the cross brace. If you drop the hitch between the rails, a good final hitch height to aim for is 46-47". This would accomodate
almost all trailers, without raising them. If you want to see an example of a hitch mounted between the frame rails, look
at Mark and Dale Bruss's website: http://www.dmbruss.com. They have quite a bit of good info on converting their Volvo 770.
When we build the next truck body we will drop the hitch between the rails,
even though it will complicate things on the build. On Volvo's there is a cross member between the frame rails to the rear
of (or near) the axle. There are a lot of air-system valves and components mounted on this cross-brace. Depending on where
this is, and where you want your hitch location, you may need to cut this down or remove it. Some people move it more forward
in order to have room for the hitch plate to drop between the frame rails. On a short wheelbase conversion like ours there
is no room to move this brace forward without interfering with the ride level valve and other components. So on a short wb
tractor where you want to recess the hitch, your only practical choice is to move the hitch far enough to the
rear to avoid interfering with the cross-brace. Careful planning of the body is required to get this right. There is
no problem moving the hitch 3-4' behind the axle center line.
If you are concerned about twisting forces flexing the frame then you might
add a cross brace at the top of the frame members. The hitch plate will brace the bottom frame members. All frame shops I
have discussed this modification with have approved this. Especially if you have a body on the truck there will be more than
enough bracing provided.